LIVE UNIQUE...

PLEASE be respectful of the artist. Our souls are in our work. The art featured here is NOT to be exploited or copied. Each original piece is photographed from the experimental stages to the end product, sealed and copyrighted by dates. Reference to other artists are for the purposes of good publicity and customer discovery. They too make a living from their hearts. Please respect that and enjoy the content for what it is. Sharing and discovery of originality and beauty.

Sunday, October 13, 2013

copper ring and a reminder of being loved


My dad had very debilitating rheumatoid arthritis.  It, along with other co morbid factors, put him in a wheelchair for the last few years of his life.  He religiously wore a copper bracelet that he had made himself.  He used to tell my kids that the green stuff that was left on his skin after wearing the bracelet was old and rotten arthritis that was drawn out by the bracelet. :)  {He was a great storyteller}. I can say with some certainty, that I cannot remember my dad's left hand ever giving him as much trouble with swelling and pain as his right.  Usually, if he was having a bad attack, it was his right hand that would be the culprit.  He never wore his bracelet on anything but his LEFT hand.  This is only what I had observed in someone who was willing to try the treatment with an open mind.  I could go all over the Internet and copy and paste facts and statistics that someone somewhere had managed to collect but have been long since plagiarized and re-posted without any firsthand knowledge.  As you all know, when posting wildcrafting recipes and ideas in my other blog, I personally have prepared and eaten everything I share and tell all the gory details associated with it so you, the reader, are prepared.

I believe that copper will work as much as you want it to work or as much as you need it to work in conjunction with other holistic remedies, it may be worth trying.  It certainly is safer for you than Big Medicine's experimental drugs with all those side effects that may actually be worse than the original problem.  As I progress through life and the inevitable comes and settles in my joints, I have no qualms with having green wrists sipping on stinging nettle tea.

So anyway, the fun part.  When my dad was alive, he would often experiment with different ideas and when he passed away, I had the privilege of getting to go through his odds and ends.  At some point, dad had sliced a copper pipe for something.  I kept the little rings in case inspiration hit me.
Last night, I was unable to sleep, so I went out int he shop and started playing with these copper rings.

I've never actually done metalsmithing, so it was all a big fun experiment for me.  Several buffing tips later...

I have this fun little ring.  


I chose loved instead of love because sometimes I need to be reminded, not only to give love, but that I am loved unconditionally in return.  Maybe this reminder will help the ring draw out negativity and loneliness as well as pain and inflammation :)

Saturday, October 12, 2013

The artist versus the crafter...


A meme featuring myself :) for when I'm dead and famous...

Get ready Facebook.  
Get ready to "like" the shit out of me. 

Tattoo trials, a confession, and a squid

A friend of mine is newly anointed into the infamous roller derby sanction, which takes this mild-mannered accountant from conservative to I-want-a-tattoo real fast.  This is just a little fooling around, but a couple of quick ideas we discussed...

The wheel.  More to her liking, as she hasn't quite committed to the whole idea in the first place and, should she actually go through with it, she wants something small.  Pft. 
Wiener. 

My original idea was a really beat up and tired skate.  Instead of flames, I wanted smoke.
I never went through with the sketch because this one was too busy and big for said accountant/newly discovered bad ass.

A fun derailment from the jewelry, but tattooing is waaaay to controlled for my taste.  This is why I shudder when someone asks me to do commission work.  I have to limit myself to the customer's expectations.  
No fun at all.  

I prefer to whim on my own and dive into what I want and then wait for the mental unicorn to come along
and love it as I made it.
Like when I decided to crochet a squid...
  
I mean really.  Who doesn't want one of THESE!???

Thursday, October 10, 2013

Run you better run, run from my bullet...earrings...

I spent the day out in the shop punching out primers from bullet casings to make jewelry, namely earrings.  A lot of people were asking for earrings as opposed to pendants and I really had to real way to utilize a decent earring.  I had made some attempts, but wasn't really happy with the overall result.  It turns out, a .22 has a very thin and easily punched out primer-capsule situation, most likely due to not being a re-loadable type of bullet.  Anyway, a little metal punch and a whack with a hammer made for a very nice, centered hole.  I was able to make some pretty neat specimens last night.


These are .22 shorts and are an 1800's friendly round that I picked up at the cowboy range.  Most specifically, these were laying all over the floor of the church after Fire in the Hills.  The flowers are fire polished Czech glass with antiqued brass filigree.

I experimented with some other sizes since my hubby bought me some small drill bits as a treat the other night.  I often break these, so a set of drill bits is better than a dozen roses to me any day of the week.  

So anyway, 30 carbines.  The lighting in my room is really crappy, but you get the idea of them anyway.  A .30 carbine was introduced in the 40's, so unlike most of my bullet casings, it's not a Victorian-era round.  I have a lovely assortment of firearm enthusiast friends that keep me supplied in odd casings. 

Here again, larger Czech fire-polished glass flowers with aged copper filigree findings. 

And lastly, another pair of .22 shorts.  Mottled, creamy green and brown Czech flowers with antiqued brass and a rhinestone roundel. 


So, that was last night's project.  I also have been working on a few dollhouse miniatures for my sister who recently acquired a very large display dollhouse with a pretty limited supply of minis to go inside.  I had some Sculpy and Fimo, so decided to try my hand at miniature making.  She had a garden plot on her Pineterest, so I went about trying to make veggies.
I'm getting the hang of it.  they are really tiny, so its a little harder than I had anticipated it to be.
Things I have learned in the process is, keep your heat gun on hand.  When you do a section or layer, hit it with your heat gun and "bake" your piece (Be careful, you can burn them and yourself.  I had the bits I was working on stabbed onto a pin that I had mounted on the end of a chopstick).  That way, when you put on the next layer, you can fiddle with all the little details without messing up your prior layer. With these tiny guys, you really don't need to bake it if you just use your heat gun.  Also, have some pastel chalks on hand.  that way you can add color layers to your items before heating them up.  This is how I got my carrots "dirty"  the carrot top is a tiny piece of moss that I had harvested and dried from the roof of my garage.  One little hunk of moss with make millions of carrot tops.  I may do a picture tutorial on my UniqueEuphoria blog to better explain my method.  Really though, this is fun and really does not cost a lot to get into.  The most expensive part is the actual clay, and you use so little making such tiny things, you really get your money's worth out of it.  All the other goodies can be found at the hardware store or in your house.  The texture of the leaves on the cauliflower was a little seashell and the leaves of the corn was textured using an old toothbrush.  It helps to Google images of the thing you are making, so you have a reference to color and texture and you can refer to the screen as you work.

Sunday, January 20, 2013

Upcycled photo frame pin cushion project

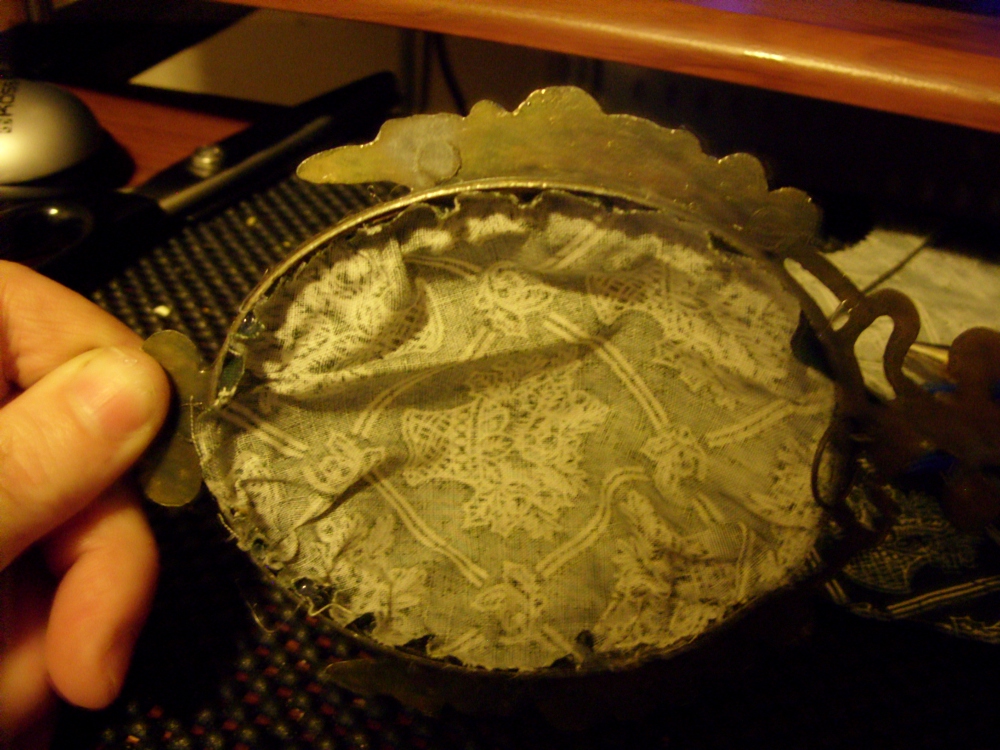
Here's a cute little idea for old, tiny picture frames.  My mom had given me a box of stuff she was cleaning out of her craft room and inside were these little picture/mirrors things:


Cute right?  I suppose the lucky person would find these and the backs would easily pop right out so you can safely remove the glass without too much drama.  Me, I live for drama.  My backs were glued in.  So a little exacto knife carving, a little prying and a little swearing, I managed to...


Ahhhhh, break the mirror   Seven year's bad luck?  I think not.  I'm recycling.  And...I'm too awesome.  I repel bad luck. Stay strong and keep prying.  


Ta da!!!!  Now choose your fabric.  Not only am I recycling the old frame, but that fabric is left overs from another project somewhere out there.  


Sorry the picture quality is kind of meh.  It's like, 5:00 a.m. and I'm trying to do this in low light, all stealthy so as not to wake up the spawn.  

So anyway, you want to cut your fabric a little bigger than the back plate thingy.  This isn't an exact science.  Just follow the general shape of your backing thing and make it a little bigger.  


Start hot gluing it down following the edge of your fabric.  Pleat it with your fingers to keep it all even.  You want this to pouf out the front of the frame.


See?  Like this.  all glued.  
Now, your back plate thingy was not made to allow for fabric.  Usually these things consist of some kind of cardboard, so take your utility knife or scissors and carve it down a bit so its a little more frame friendly.

Your going to want to get some fiberfill.  You don't necessarily need to spend money on this either.  I like to visit the dump weekly and see what I can find.  An example would be leather chairs.  Always carry utility knives with you so you can harvest the free.  Within those leather chairs is an endless supply of perfectly usable and clean fiberfill.  WOO!

Pack that inside the fabric pocket while hot gluing the back thingy (I'm sure this is the official name for it).  Use a pencil or something to get the fiberfill under control while gluing in your back thingy.  

This is going to be under a little stress, with the fiberfill all packed in there, so run a bead of hot glue around the edge to neatly seal everything up.  
When your done, you have a cute pincushion.  I left the hanger thing (yet another official term) on the back so I could hang it up on the wall next to my sewing area.  


You can use any frame to do this.  I happened to like the antique look, so I kept it pretty original, but you can spray paint your frame or embellish it any way you want.   Have a friend who likes coffee?  Make one with coffee theme fabric and embellish with coffee buttons.  Sewer?  Wine drinker?  Pirate lover?  Trust me here, they have a fabric for that.  Go nuts. 


Wednesday, September 26, 2012

teapot surprises

Yep.  I'm a swapper.  I love to do those cool mail swaps where you have some kind of a challenge and then get a random partner to send to?  Well, if you've never done it, go to swapbot.com and sign up.  Its free and super fun.
The last swap I did was supposed to be for a cup of tea and a letter.  You get 2 partners to which you send 2 teas/packaged beverages and a letter.  as long as you follow those rules, your good. However, I LOVE getting fun mail and extra special things and I honestly believe that you get what you receive, so I try to make mine special.

What I did was, I drew a teapot freehand onto a piece of paper and then cut out each section that I want to applique   Like this:


Then, you pick your fabric and iron it on to stabilizer--the thicker the stabilizer, the better, especially when you have tiny swirls and corners to stitch around. 

Then, you trace each piece out onto the stabilizer side of the material and cut it all out.  For interest, use coordinating colors, but different fabrics for each piece.  

I then take a piece of felt and tightly zigzag all the way around the piece, making sure to leave an opening at the top so you can put things into your teapot. 


You end up with a little something like this.  You want to trim the felt edges of the teapot for a nice finished look.  I added a pocket in the front too, to put my letter in for my partner.

And here it is!  all packed up and ready to go!  It was very easy and the pot only took about an hour extra to put together.  A little effort and my partners have a super special surprise.

I also offer little things like this in my Etsy shop all pre-made for the swapper.  Not everyone is crafty, but everyone loves special just-because surprises.  That little something extra will make someone.s day.

https://www.etsy.com/listing/104776939/vintage-1960s-fabric-coffee-gift-set

Because I'm on the subject of surprises, Look what I GOT TODAY!!!!


Monday, September 10, 2012

SUPER QUICK!!!

Okay, I am supposed to be working at my "real" job, but I really wanted to post this quick.  First, "the story."

So, year ago my mom gave me a box filled with tons of crochet hooks that belonged to my grandmother and great grandmother.  I was thrilled, but both of them were doily makers and most of these hooks are teenie weenie!!!  With the hooks came a bag of cotton thread that you used them with.  basically, string.  not yarn, not something bulky and quick and warm.  String.  Thread even.  As an impatient artist, I lovingly put these hooks to the side along with the thread and convinced myself that I would NEVER have the patience for anything less than worsted weight and a size H hook.  The other day, I was looking for lace applique to make jewelry and realized, it looked just like the doilies my grandmas made, only not round...

So,  I went looking for patterns, but as I said before, I am super impatient.  So, the pattern thing never really does me any good because after the first couple of rows or whatever, I go all independent freelancer and do what the hell I want.  I managed to work out a little something.  Of course, it's freehand, so there is no exact numbers, which adds to the wonky appearance; however, the deed has been done.  I made me a choker with one of my grandma's teenie weenie hooks and some of her string.  TA DAAAAA!   I am currently blocking it which is why you see all the pins, but you get the drift of what I was experimenting for.


Now, will I do it again?  Hmmmmmmm...it IS terribly cool, though my hand was not loving the tiny hook.  I may need to fashion a more ergonomic grip on these hooks before trying again, but yeah.   I can do this.  Hi grandma (s)!  I did it!!!